In a world where security is becoming an ever-present concern, reliable and effective systems for detecting unauthorized access or movement have become essential. Among the various technologies available, passive infrared (PIR) sensors offer an elegant solution. These sensors detect infrared radiation, which is emitted by humans and animals, and use this information to trigger an alarm when movement is detected.
This project focuses on building a PIR motion detector alarm system using an Arduino. The goal is to create a simple yet highly effective motion detection system that provides real-time alerts when a change in the environment is detected. The PIR sensor detects motion by sensing temperature variations, while the Arduino processes the sensor data and triggers an alarm when a certain threshold is crossed. This project not only enhances security but also demonstrates how basic sensor technologies can be integrated with microcontrollers to build practical, real-world solutions. By utilizing the Arduino platform, which is user-friendly and versatile, we aim to create a motion detection system that is both easy to build and highly functional for home or office security purposes.
Components Required
- Arduino Uno
- LCD Display (16x2) or use the Serial Monitor
- Known Resistor (e.g., 10kΩ resistor)
- Electrodes/Probes (copper wires or metal clips)
- Metal Samples for Testing
- Breadboard
- Jumper Wires
- Power Supply (USB cable or 9V battery with proper regulation)
Circuit Diagram
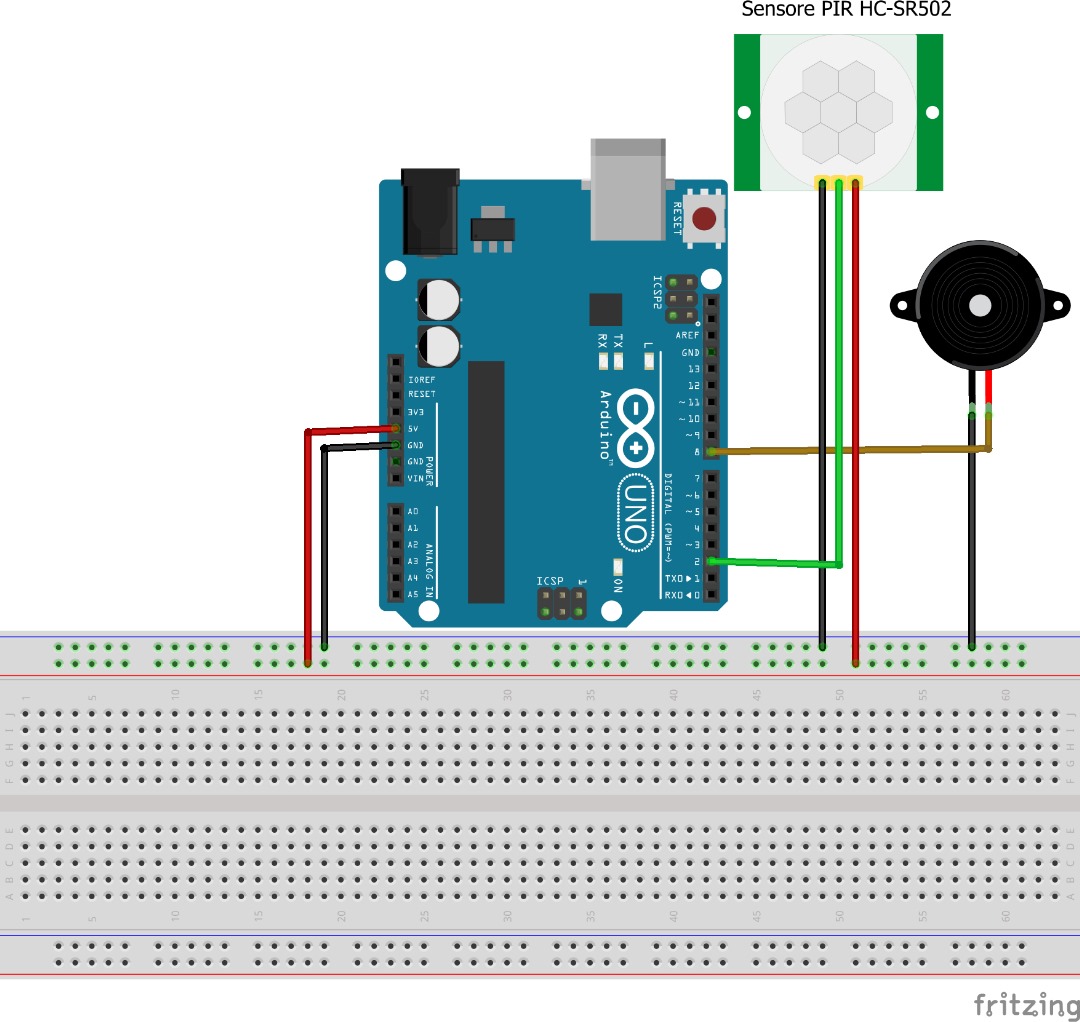
Component Connections
Connecting the PIR Sensor to the Arduino
The PIR motion sensor detects infrared radiation and outputs a HIGH signal when movement is detected. The sensor uses three pins: VCC, GND, and OUT.
- VCC (Power Input) → Connect to the 5V pin on the Arduino to supply power.
- GND (Ground) → Connect to the GND pin on the Arduino.
- OUT (Output) → Connect to a digital input pin (e.g., D2) on the Arduino to read the sensor’s output.
Why use the PIR sensor?
The PIR sensor detects infrared radiation emitted by warm bodies, like humans or animals. When motion is detected, it outputs a HIGH signal that triggers the alarm.
Connecting the Buzzer to the Arduino
The buzzer emits a sound when activated by the Arduino.
- Buzzer + (Positive Pin) → Connect to a digital output pin (e.g., D8) on the Arduino.
- Buzzer - (Negative Pin) → Connect to the GND pin on the Arduino.
Why use a buzzer?
The buzzer provides an audible alert when the system detects motion. It is simple and effective for signaling the presence of intruders.
Powering the System
- Arduino Power: Connect the Arduino to your computer or power bank using a USB cable to power the system.
- PIR Sensor Power: The PIR sensor is powered through the Arduino’s 5V pin, ensuring it operates with minimal energy consumption.
Installing the Components
Mounting the PIR Sensor
Secure the PIR sensor in a location where it has a clear line of sight, such as near an entrance or a hallway. Ensure it is not obstructed to guarantee accurate motion detection.
Setting Up the Buzzer
Place the buzzer in a location where the sound can easily be heard, such as near the door or within earshot of the area you wish to monitor.
Uploading the Code to the Arduino
- Open the Arduino IDE on your computer.
- Paste the provided Arduino code into a new sketch.
- Connect the Arduino to your computer using a USB cable.
- Select the correct board and port in the Arduino IDE.
- Click the Upload button to transfer the code to the Arduino.
Once the code is uploaded, the Arduino will start monitoring the PIR sensor for any motion. When motion is detected, the buzzer will sound, signaling the user.
CODE
|
CODE EXPLANATION
Pin Initialization
"pinMode(pirPin, INPUT);
pinMode(buzzerPin, OUTPUT);
We set the PIR sensor pin as an input and the buzzer pin as an output.
Reading the Sensor Data
"motionState = digitalRead(pirPin);
The motion state is read from the PIR sensor. If motion is detected, it returns a HIGH signal.
Triggering the Buzzer
"if (motionState == HIGH) {
digitalWrite(buzzerPin, HIGH);
Serial.println("Motion Detected!");
} else {
digitalWrite(buzzerPin, LOW);
Serial.println("No Motion");
}
If motion is detected (HIGH), the buzzer turns on, and a message is printed to the serial monitor. If no motion is detected (LOW), the buzzer turns off.
Delay
"delay(200);
The delay ensures the sensor reads are not overly frequent, giving it time to process.
How It Works Together
The PIR sensor constantly monitors its surroundings. When motion is detected, it sends a HIGH signal to the Arduino, which activates the buzzer to alert the user. If no motion is detected, the buzzer remains off.
Observing Functionality
- Normal Mode: The system is idle, and no motion is detected.
- Motion Detected: The buzzer sounds, signaling the presence of movement.
- No Motion: The system remains quiet, with no alert.
Common Problems and Solutions
- Buzzer Not Sounding
Cause: Incorrect wiring or faulty buzzer.
Solution: Double-check connections and test the buzzer with a direct connection to power. - Motion Not Detected
Cause: PIR sensor not properly positioned or calibrated.
Solution: Ensure the sensor is installed in a location where it has an unobstructed view of the area.
Conclusion
This PIR motion detector alarm provides an efficient and reliable security solution. By using an Arduino and a PIR sensor, it offers real-time motion detection with minimal components, making it an excellent choice for simple security applications. The system’s ease of use and effectiveness highlight the potential of automation in personal security.